Release Notes > 5.40.0
Webiny 5.40.0 Changelog
See what's new in Webiny version 5.40.0.
 release on GitHub.
Breaking Changes❗
Removed Deprecated APIs (#4051)
With this release, we’ve removed a couple of frontend and backend JavaScript APIs that were marked as deprecated in previous releases.
For more information and how to migrate your code, please refer to the separate Removed APIs article.
Updated Webiny to Use React 18 (#3771)
With this release, we’ve updated Webiny to use React 18.2.0.
This was a really large codebase update, and it may introduce breaking changes in your project. Earlier, React was a bit more relaxed about “implicit any”, but with React 18, it made its types much stricter. The upgrade guide contains instructions on how to verify that your project was upgraded correctly, before you deploy it.
The biggest dependency update was to the RMWC package from version 8.x to version 14.2.2, because that version did not work with the React 18.x.
There were a lot of changes from 8.x to 14.2.2, so please check the RMWC changelog for more information.
Please check your project for any issues and update your code accordingly.
If you find any Webiny related issues, please report them on our Slack channel or GitHub repository.
Pulumi V6 (#4096)
As mentioned in the Introducing Pulumi v6 section below, we’ve upgraded Pulumi to version 6. Although no breaking changes are expected, we’ve still compiled a list of all of the things you can expect upon doing your first redeployment after the upgrade here.
Headless CMS
Introducing Trash Bin (#3976,#4059)
With this release, we are introducing the indispensable Trash Bin feature for Headless CMS, ensuring that valuable data is always recoverable.
 Trash Bin for Headless CMS
Key features:
- Soft Deletion: users can move entries to the Trash Bin instead of permanent deletion, preserving data integrity.
- Efficient Navigation: the Trash Bin is conveniently located at the bottom left-hand side of the app screen. Each content model has its own Trash Bin.
- User-Friendly Interface: inside the Trash Bin, users can search, sort, and select records for restoration or permanent deletion using a familiar interface.
- Automated Cleanup: to maintain system efficiency, a cron job purges eligible items from the Trash Bin daily. Records older than 90 days are permanently purged during each cleanup.
- Configurable Retention Period: to customize how long the deleted entries are kept, developers can adjust an environment
WEBINY_TRASH_BIN_RETENTION_PERIOD_DAYSvariable.
Support for Reference Fields in Advanced Search Filter (#3783)
With this release, we are enhancing our Advanced Search Filter Builder adding the support for reference fields.
With the latest update, users now have the option to add reference fields in their search criteria using the easy-to-use Autocomplete input field. This means that users can search for the models that were defined during entry configuration and quickly select the referenced entry that best fits their requirements.
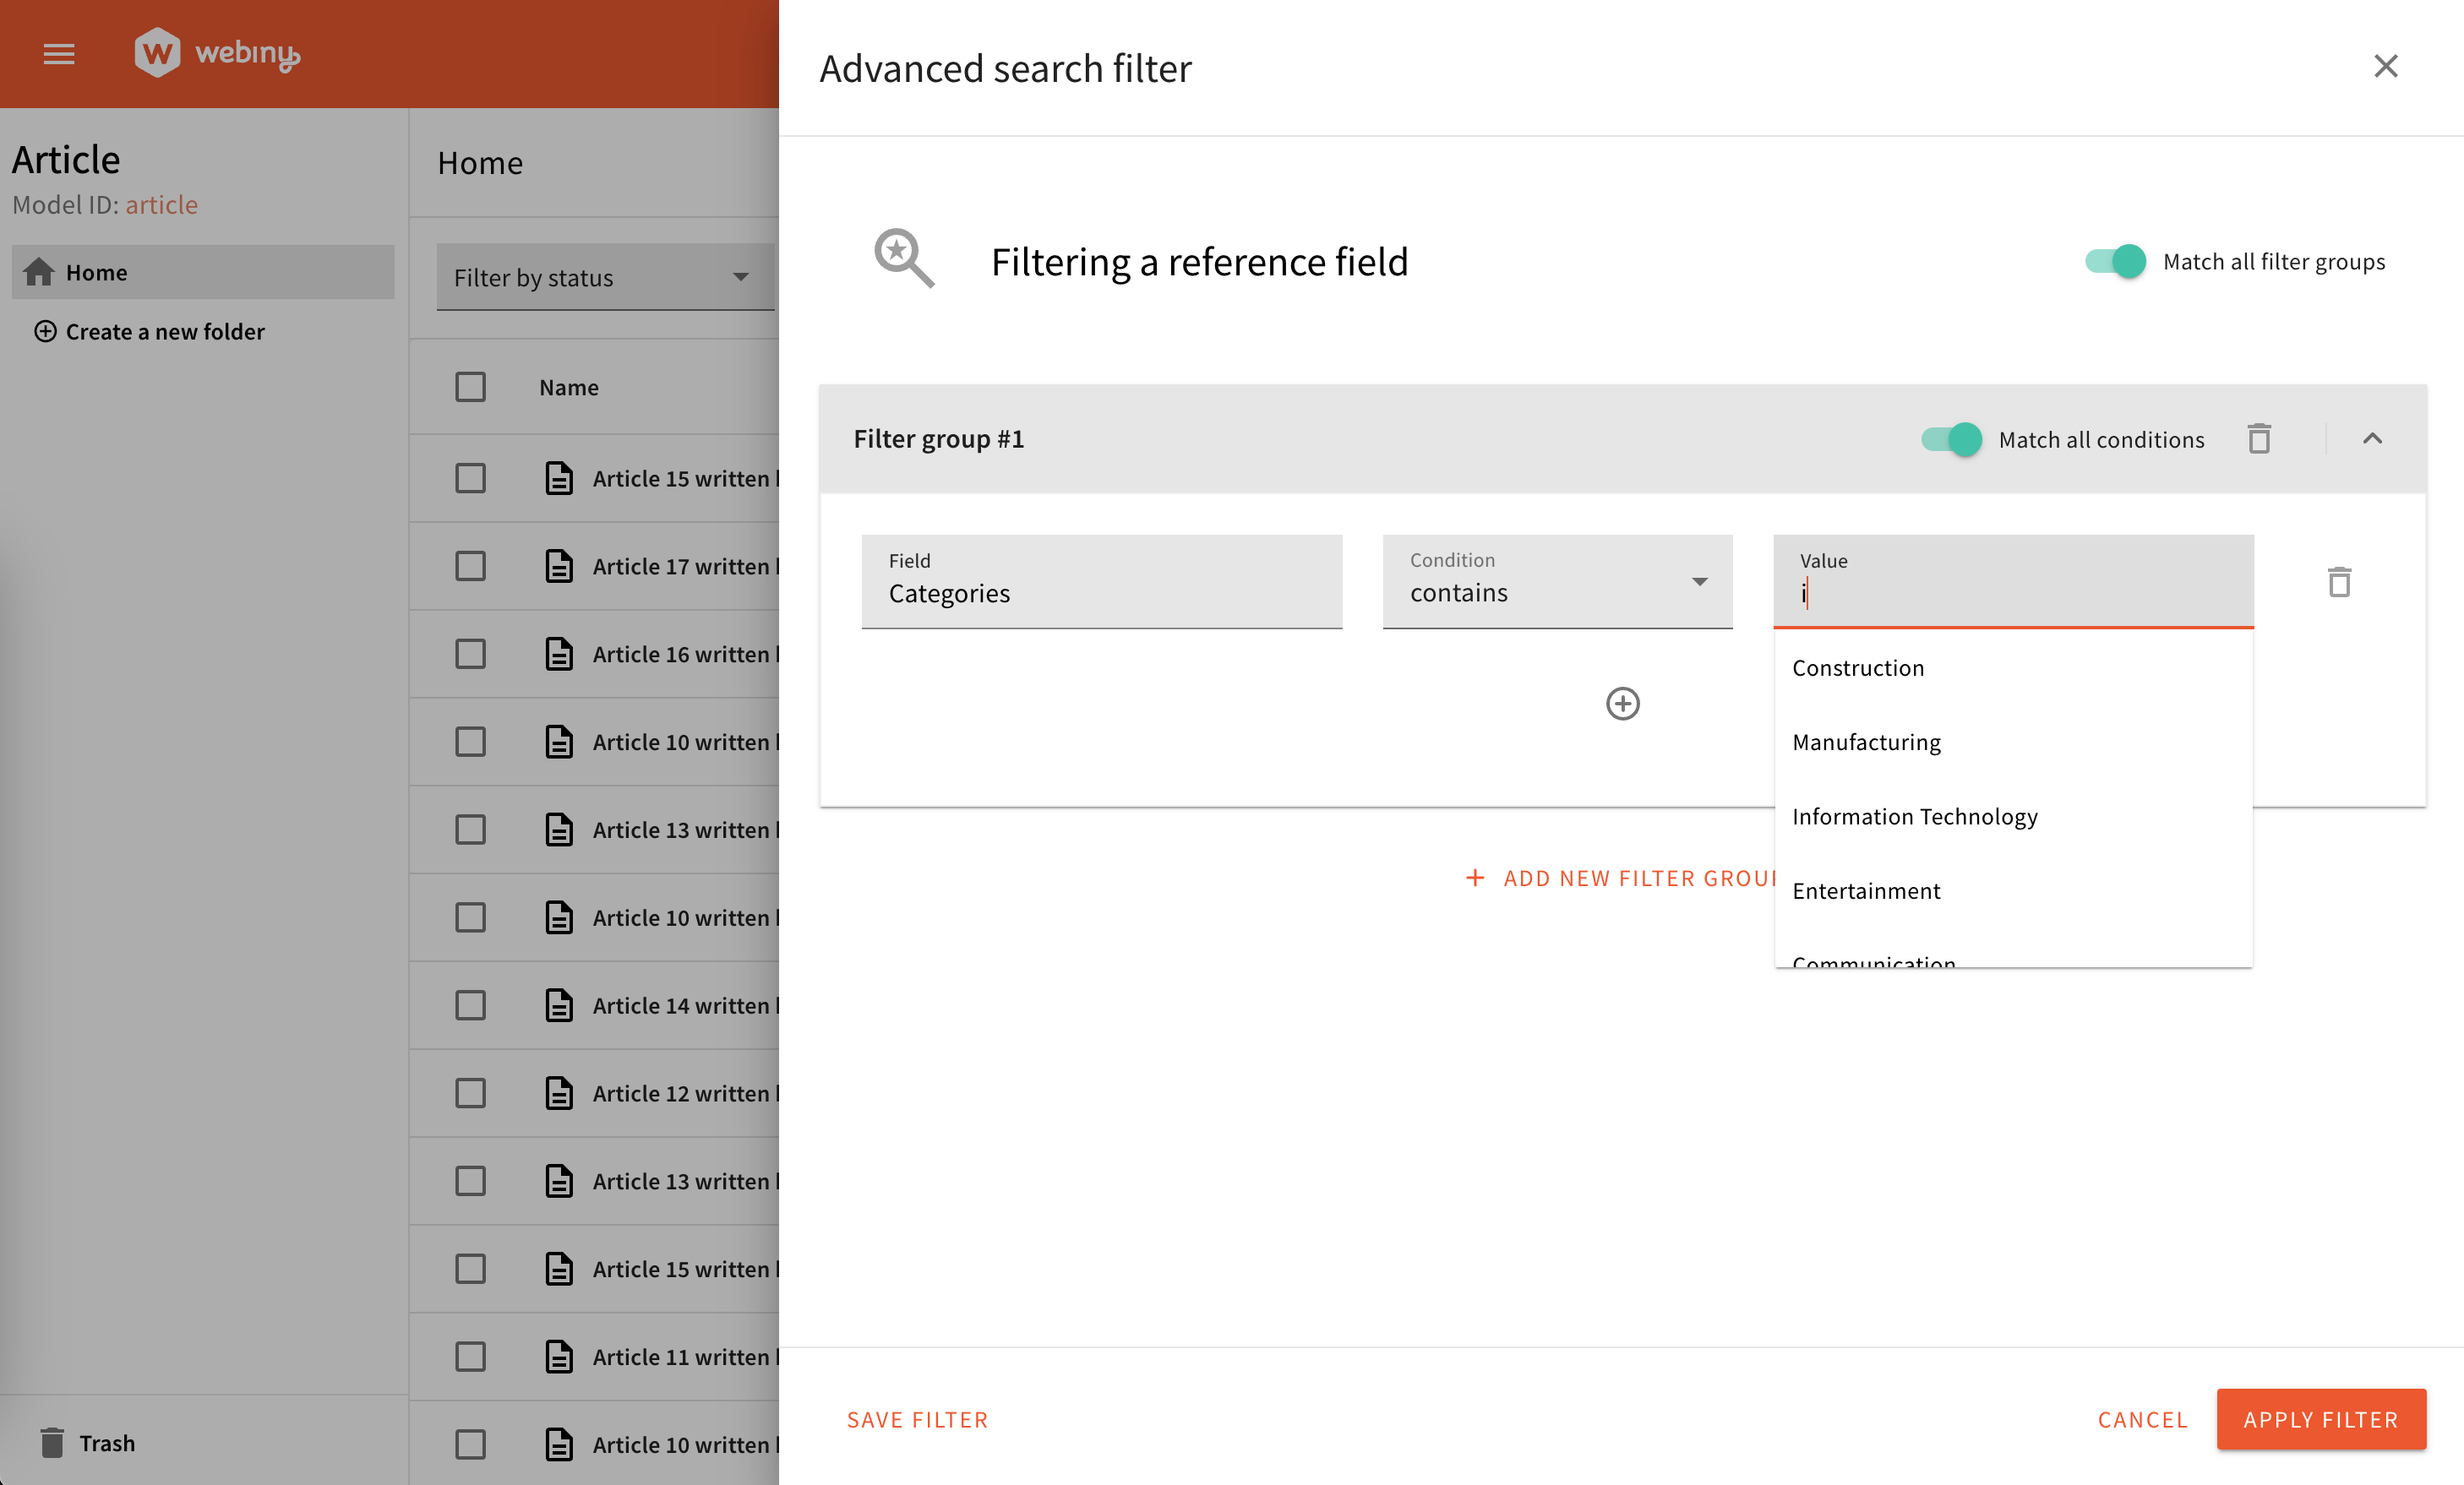 Advanced Search Filter's support for reference fields
Introducing Record Locking Mechanism (#4065)
For our Enterprise clients, we are introducing a new feature that allows users to lock entries in the Headless CMS. This feature will prevent multiple users to edit the same entry.
The feature is only a UI feature and does not prevent users to update entries via direct API calls.
When a user starts to edit a record, the record is automatically locked for all other users. The lock is released when the user, editing the record, exits the editor or the lock time out occurs. Also, a user can be kicked out from the record by another user with sufficient privileges.
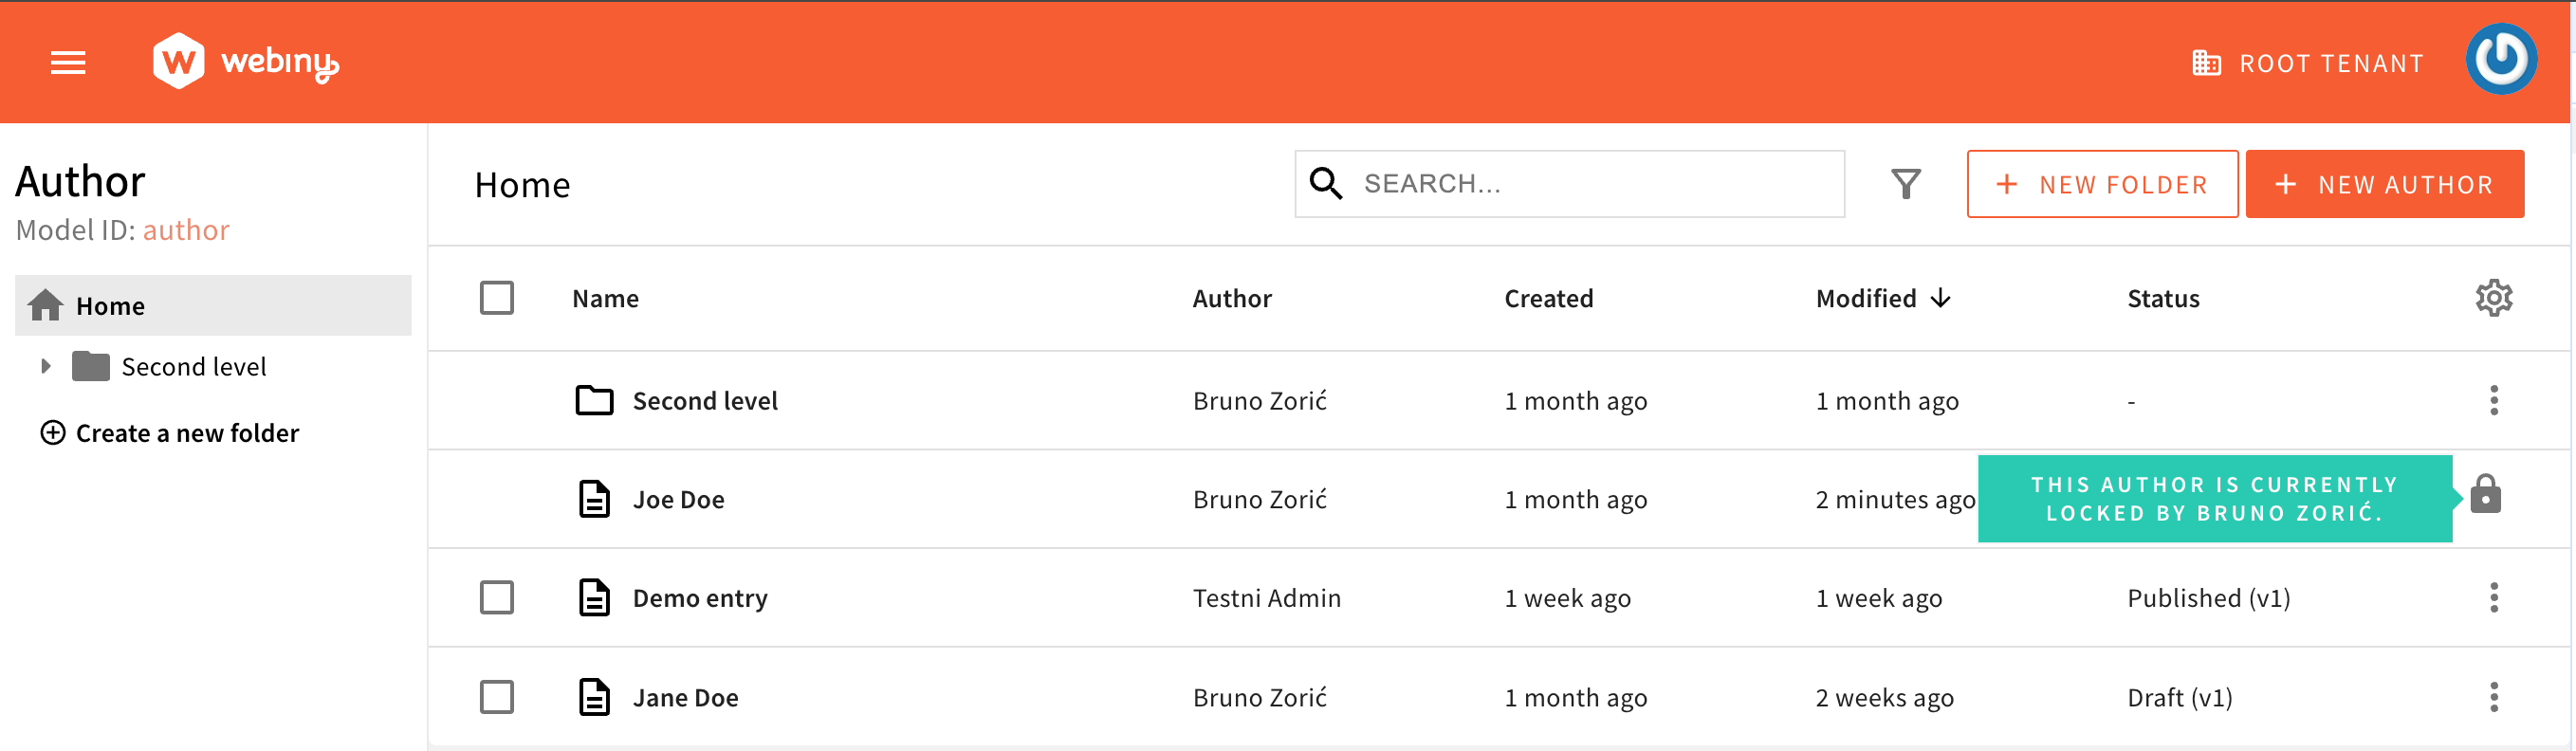 Locked entry in the list
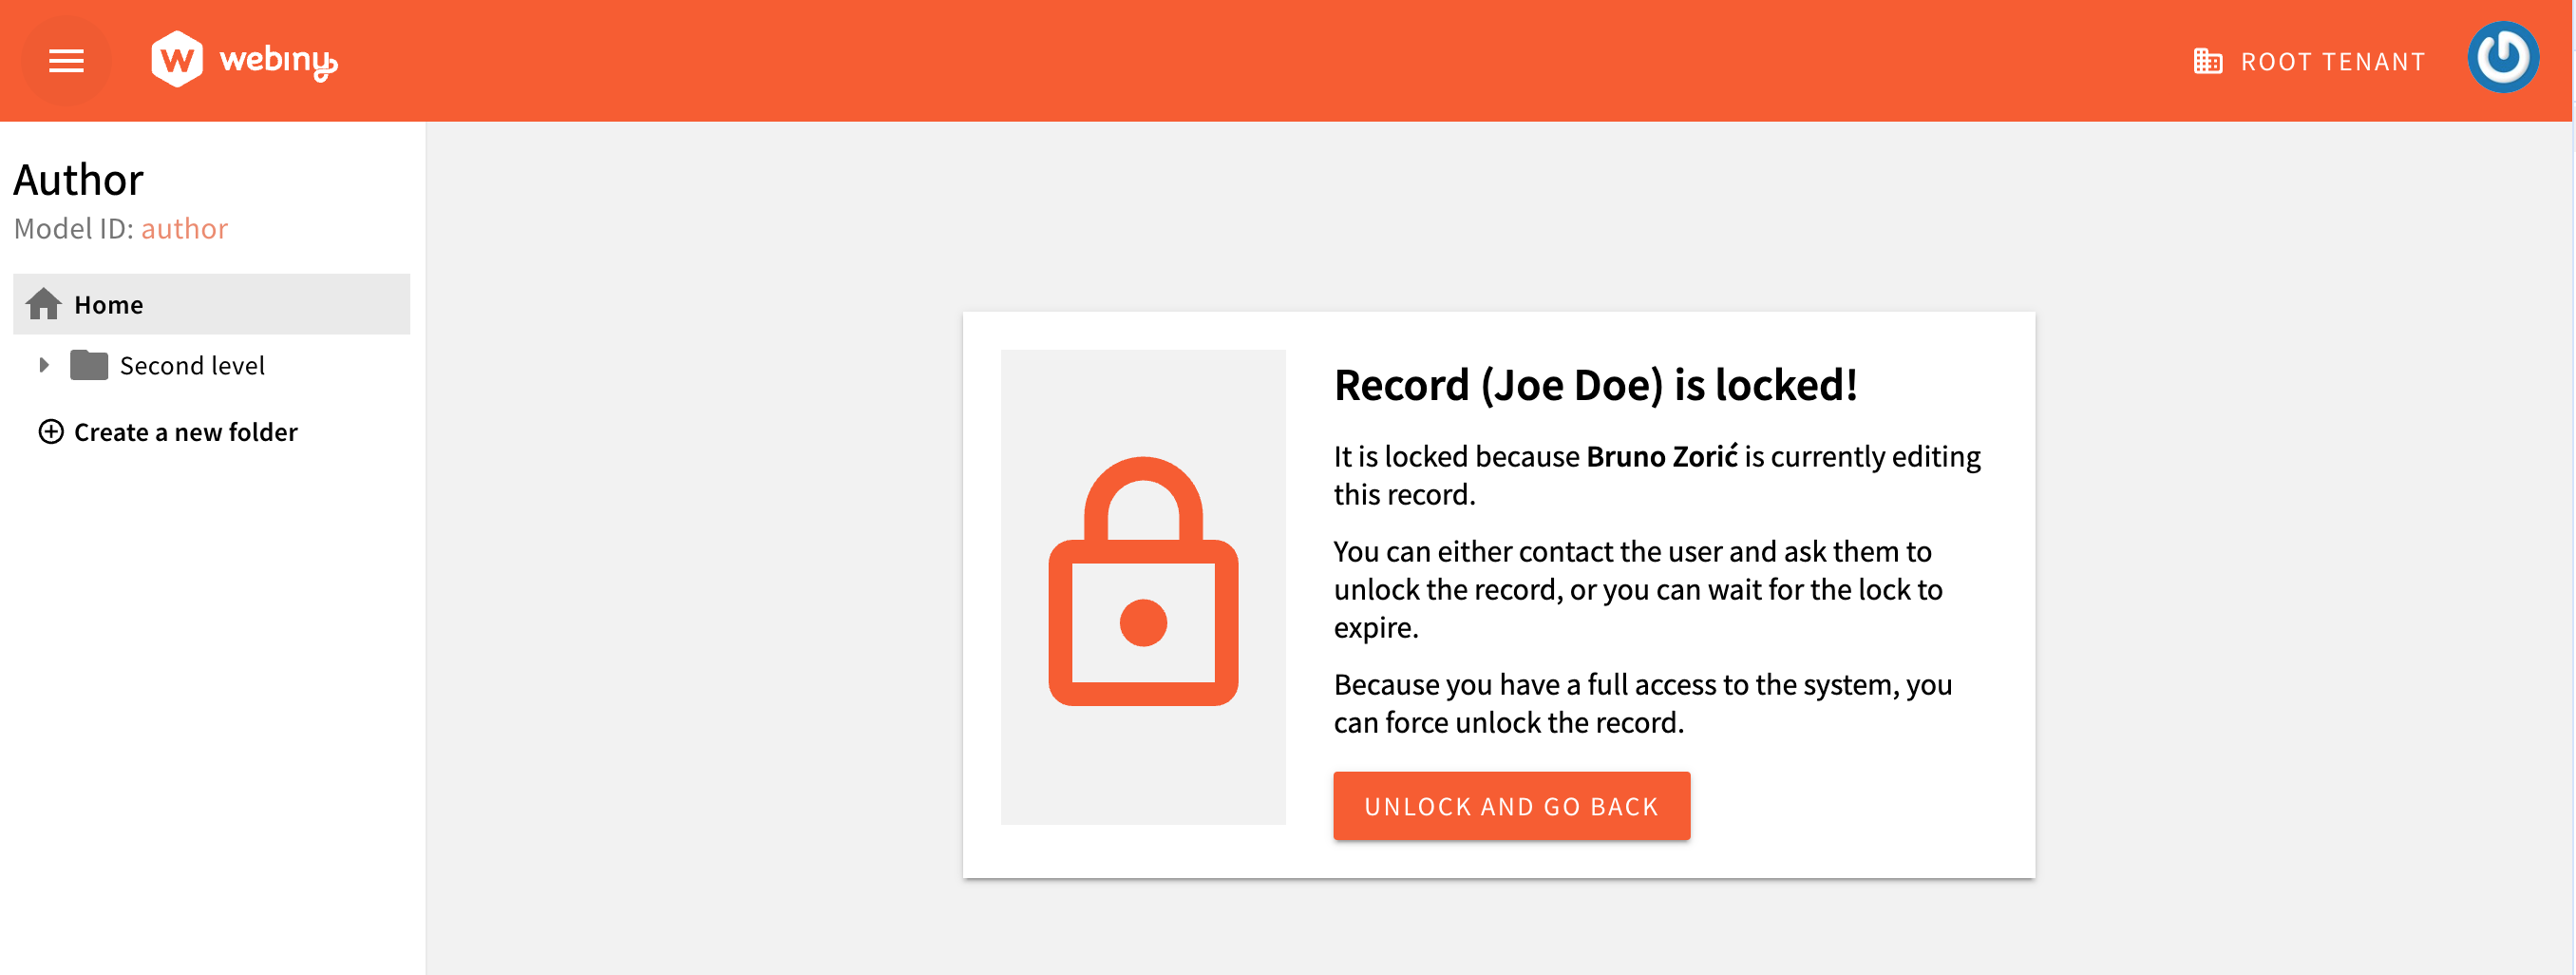 Locked entry when trying to edit it
 Force unlock the entry
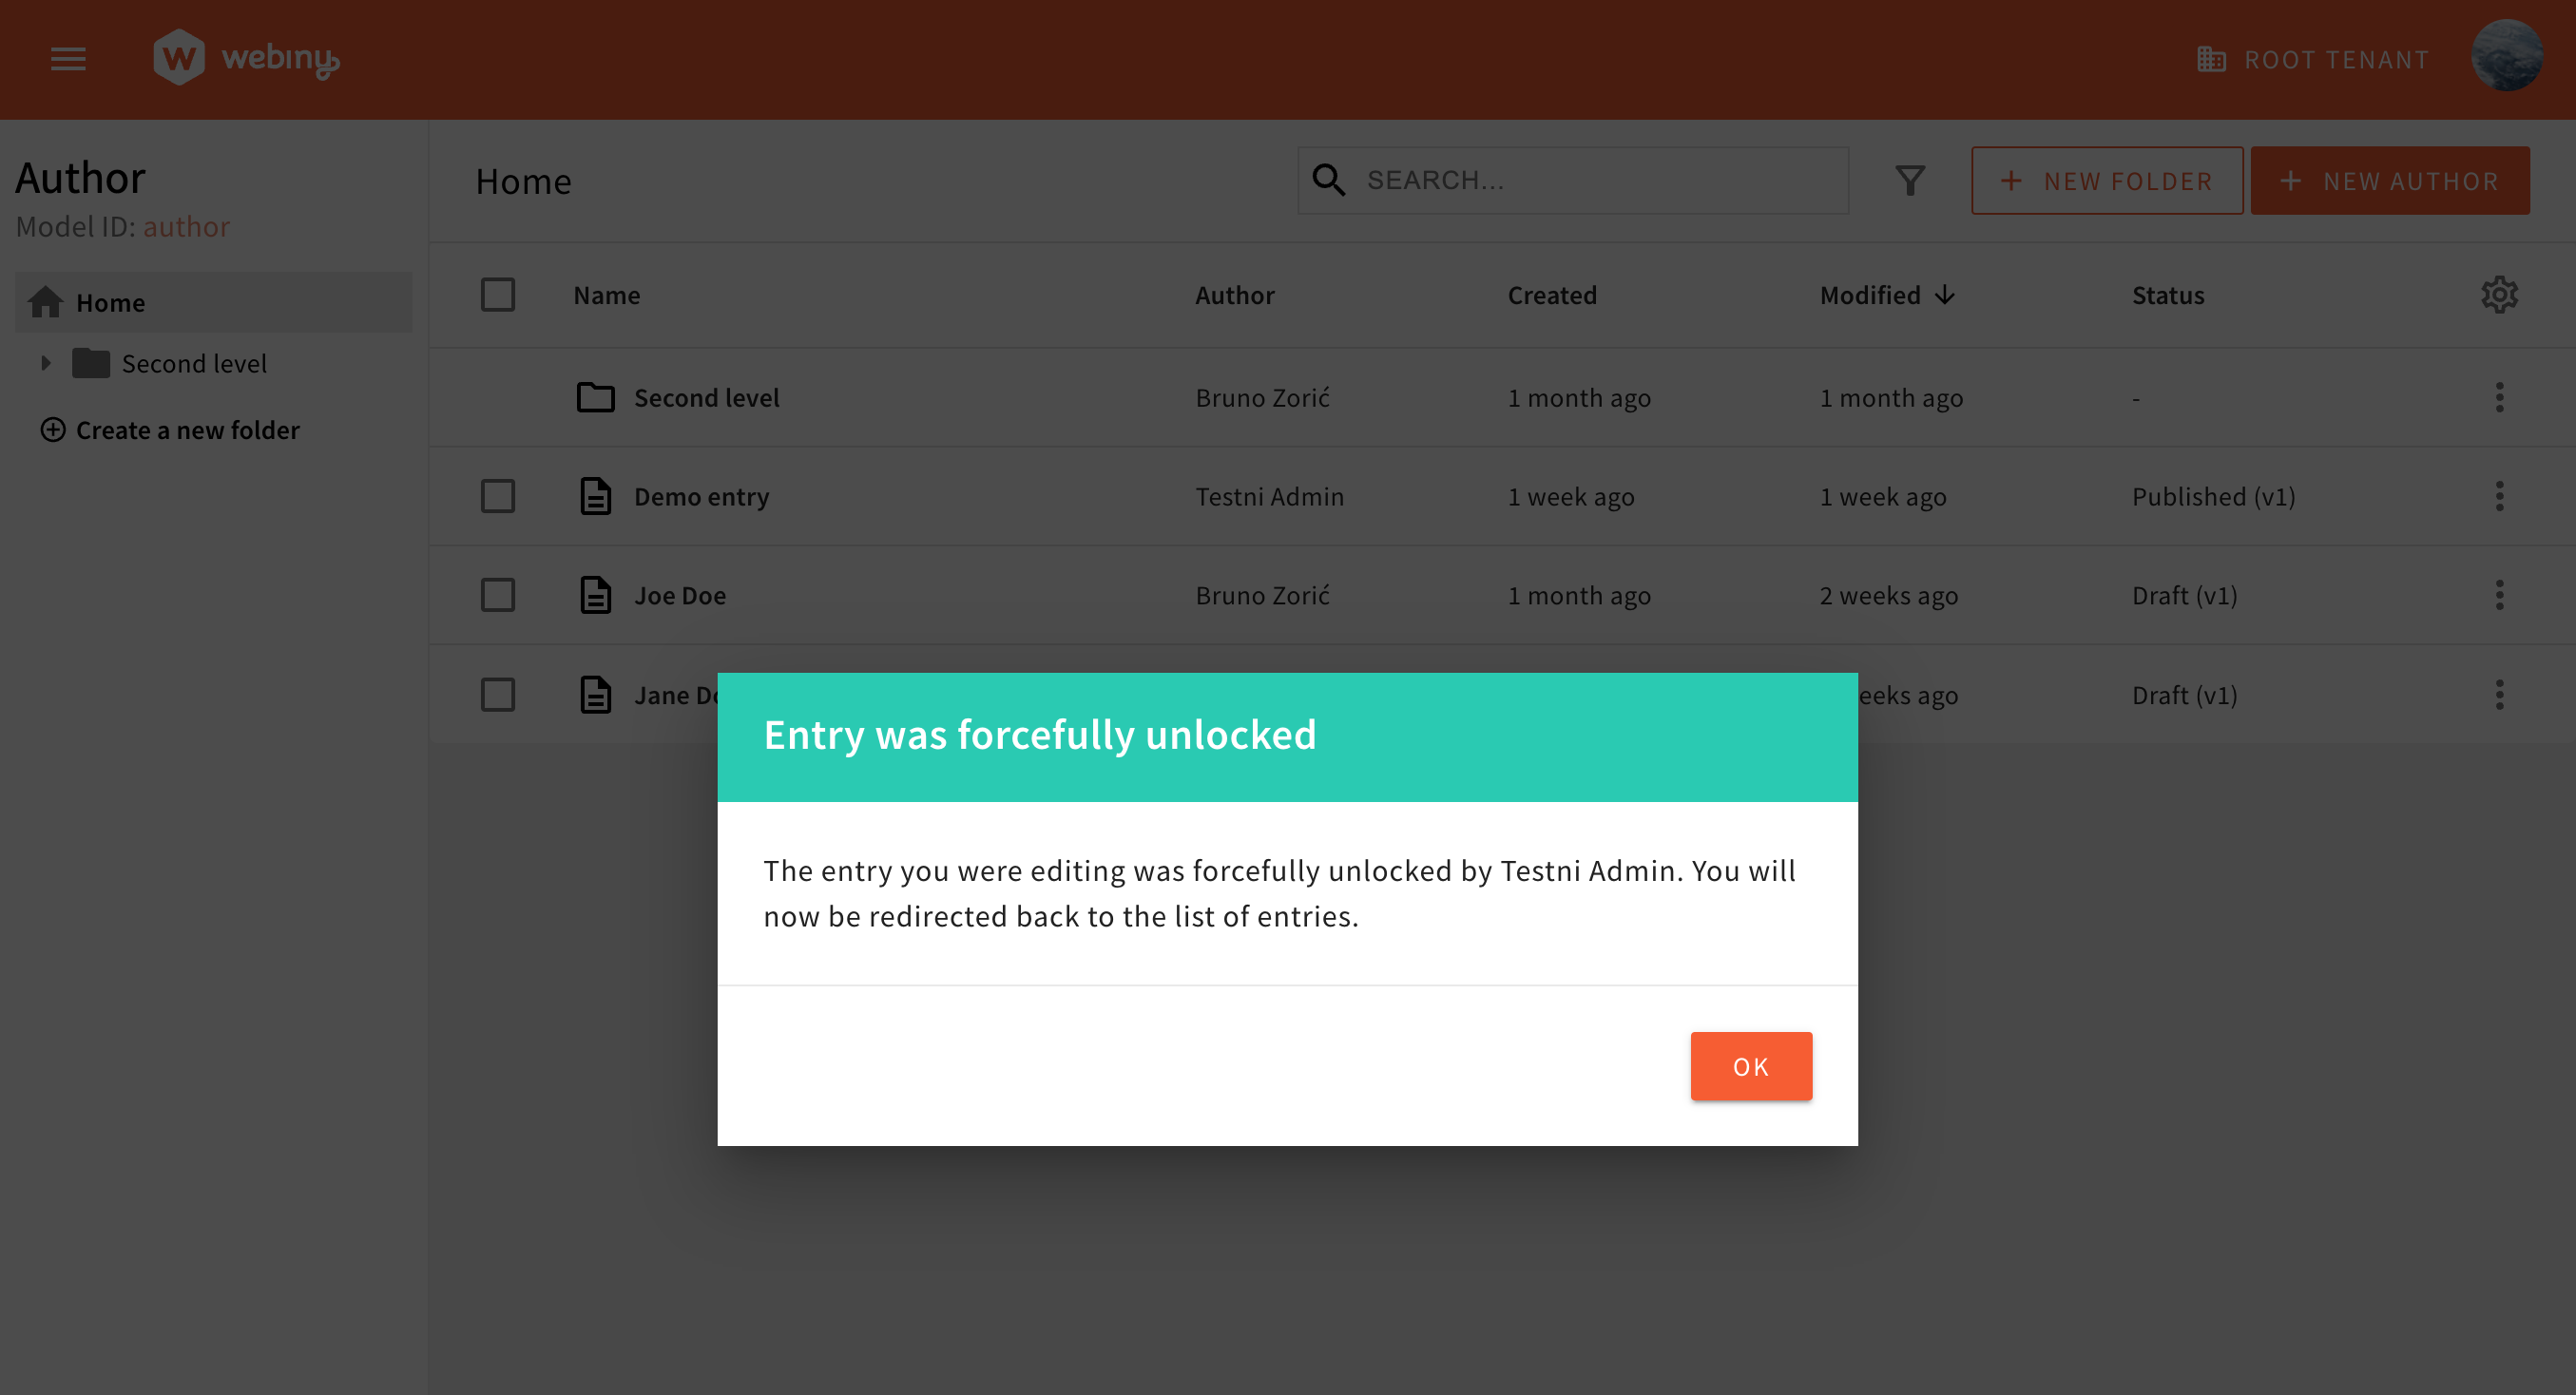 Forcefully unlocked entry and redirect to the list
By default, the locking timeout period is 1800 seconds (30 minutes). But if you want to change it, just set the environment variable, with value in seconds:
Content Entry Traverser (#4072)
Content entry traverser allows you to traverse any given content entry using the underlying content model AST, which is generated from the content model definition. The tool will automatically pair every key being visited with its field definition, generate its dotted path within the entry, and give you its value, so you can apply your logic to every available key/value pair.
This tool is very useful in situations when you need to, for example, extract specific values from an entry, send them to an external API for processing, and then inject the processed values back to their original position in the source entry, asynchronously (via webhooks, for example).
To learn how to use it, visit the Content Entry Traverser article.
Field Renderer Settings
Field renderer plugins now support renderer settings. This means you can now implement a configurable field renderer, define its settings, and then configure your renderer on per-field basis. It looks like this:
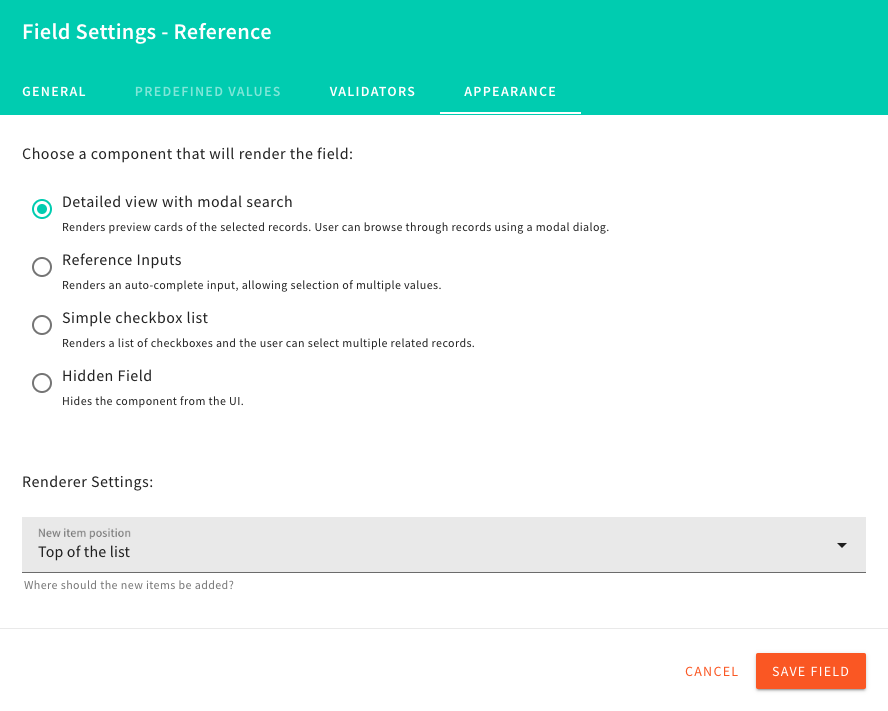 Field Renderer Settings
Decoratable Hooks and Components
Headless CMS now provides access to several key components and hooks which allow you to add all kinds of customizations to the default CMS functionality. You can now intercept content entry form save action, content entry create, update, publish, unpublish, delete actions, decorate them, add your own custom logic and UI (like confirmation dialogs, content validation, etc., add custom content providers that wrap the content entry form), and more.
As an example of what this allows you to do, we’ve created this interesting example, where, depending on user’s selection, some related field’s validation and help text change. This is just one of many, many use cases that you can implement using decoration of hooks.
 Conditional Validation and Help Text
We’ll cover various scenarios in our docs, but we want you to know that this is now possible, and if you’re interested in a specific scenario, let us know on our Slack community channel, and we’ll help you out.
Page Builder
Next Level Editor Customization
Page Builder editors (Block editor, Template editor, and Page editor) were rewritten to support a whole new level of customizations. You can now add/modify/remove almost any element in the editor UI, as well as change the layout of the editor itself, but also individual sections of the editor. Find more details and code examples in a dedicated article on Editor Customization.
Add Duplicate List and Bulk Action (#3876)
With this update, we have added the highly requested “Duplicate page” action as both a bulk and list action.
Previously, the functionality was available exclusively within the page details drawer. However, we’ve now extended this capability to make it more accessible and convenient for users, allowing them to duplicate multiple pages at once directly from the main interface.
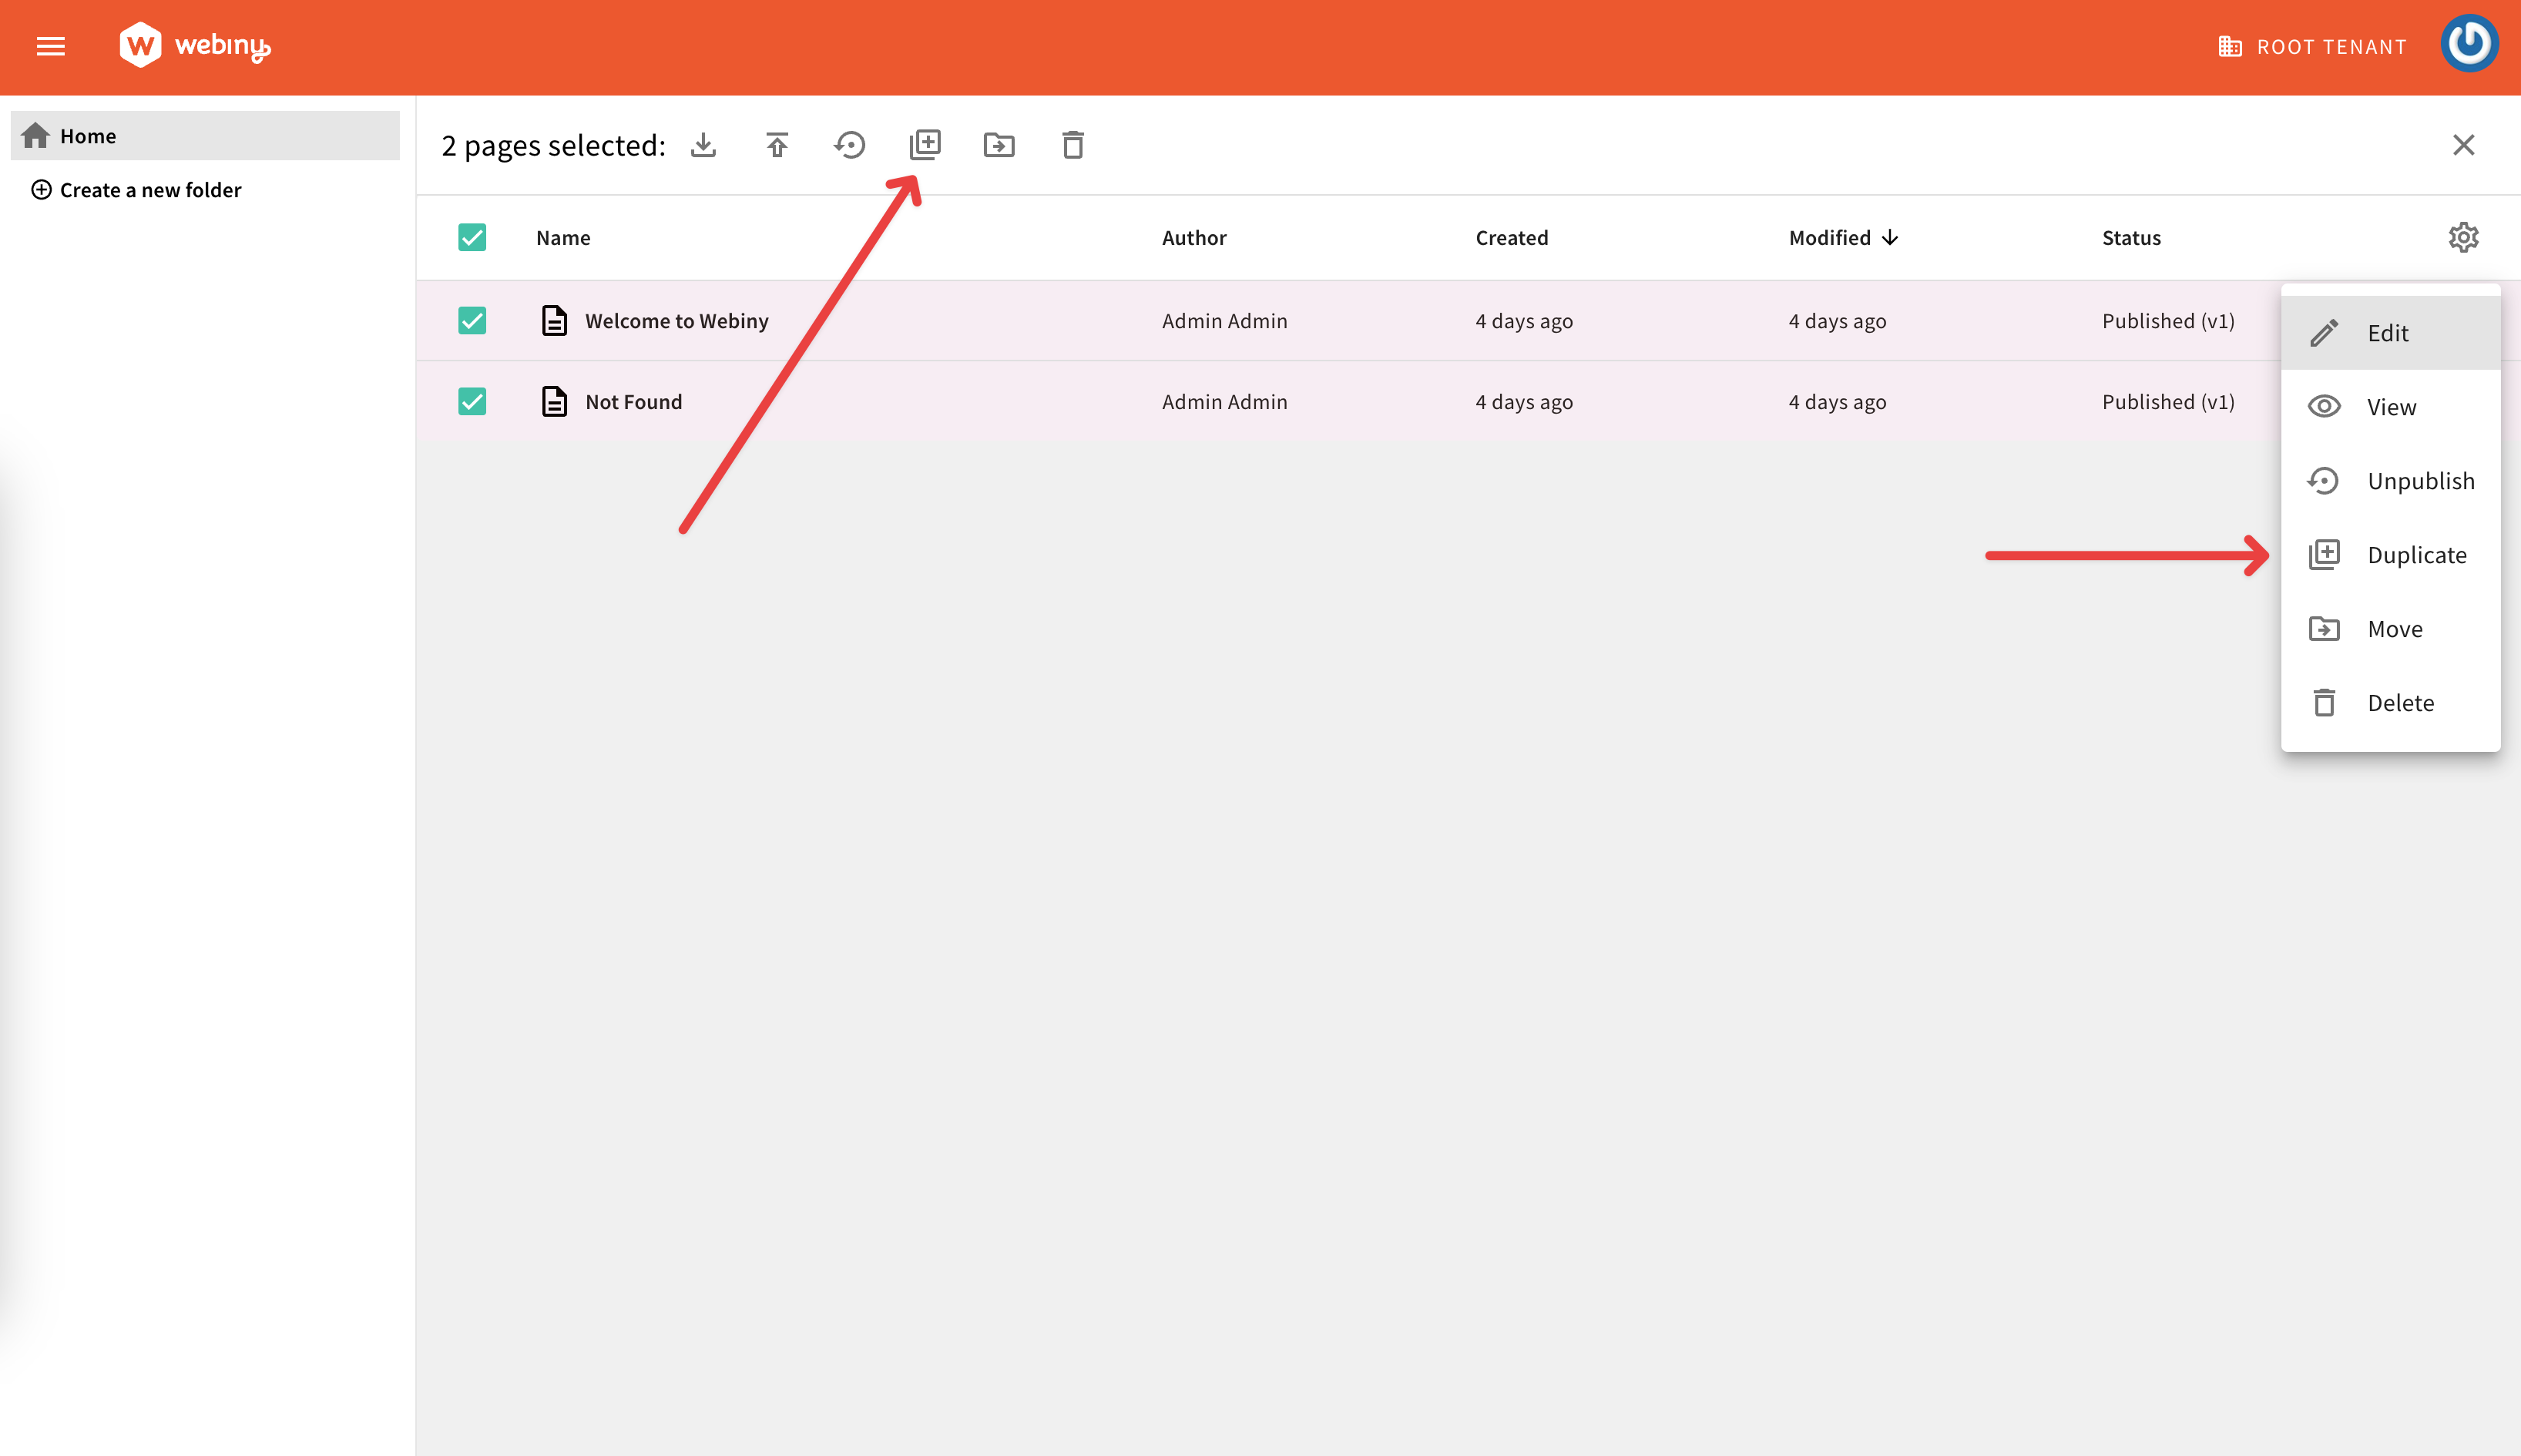 Duplicate list and bulk action
Stable Element IDs (#3977)
Until this release, every time you loaded a page in the Page Editor, its content elements would get their id attribute regenerated. This had to do with using predefined (saved) blocks from the Block Editor.
Recently, this logic started causing problems and became a blocker for implementing some interesting features. With this release, we’ve fixed the logic of handling element IDs across all PB editors, and element IDs are now reliable and “stable”. You can now confidently reference page elements by their IDs, and know that they won’t change, until you delete them.
For detailed explanation of what’s happening in the process of blocks and variable interpolation, read this PR.
Theme Folder Changes (#4135) (#4138)
With this release, we’ve made a couple of changes to the theme folder, that was previously located in the apps folder.
For starters, the theme folder has been moved from the apps folder to the new extensions folder. This change was made to better reflect the purpose of the folder, which is to store all custom extensions.
More information about the new extensions folder can be found in the Introducing Extensions section.
The actual theme code is now also located in the src folder, which is the standard location for all extension-related code. This change was made to ensure that all custom extensions are stored in a consistent location, making it easier to manage and maintain them.
Finally, the Reset CSS styles that have been residing in the theme/global.scss file have been removed (reference). This change was made to ensure that the default theme is as clean and lightweight as possible, while still providing all the necessary functionality.
For existing projects, the theme folder will be automatically moved to the new extensions folder during the project upgrade process. This change will not affect any existing customizations and everything should work as expected. For more information, please refer to the separate Theme Folder Updates article.
Development
Introducing Extensions (#4111)
In our continuous effort to improve the developer experience, with this release, every Webiny project will now include the new extensions folder. As the name suggests, this folder is intended to store all custom extensions, making it easier to manage and maintain them.
Notice how the folder was named extensions instead of plugins. This was done intentionally, because when extending Webiny, different approaches are used. For example, all Admin extensions are made via different config React components. For example, when customizing file preview in File Manager, the following code is used:
On the other hand, API extensions are done via one or more plugins. For example, when working with lifecycle events in the File Manager, the following code is used:
So, to better reflect this, we’ve decided to use the extensions folder name, which is more generic and can be used for both types of extensions.
Furthermore, in order to make it easier for developers to create new extensions, we’ve also introduced the New Extension scaffold that can be used to quickly create new API and Admin extensions. The scaffold will automatically create the necessary files and folder structure, allowing developers to immediately focus on the actual implementation.
Ultimately, the goal is to make the extension creation process as seamless as possible, enabling developers to quickly and efficiently extend Webiny to meet their specific requirements. With the new extensions folder and the New Extension scaffold, we believe we’ve taken a significant step in that direction.
For more information, please refer to the new Extensions article.
Note on Backward Compatibility
In terms of backward compatibility, note that all the existing customizations will still work as expected. Optionally, you can move your custom extensions to the new extensions folder to keep your project organized.
Documentation
Note that some of the existing documentation has already been updated to reflect these changes, for example Customize File Preview or Customize File Actions articles. But, there are still articles that we will be updating in the upcoming weeks (users will still be able to follow them in the meantime).
In any case, if you encounter any issues, please report them on our Slack community channel.
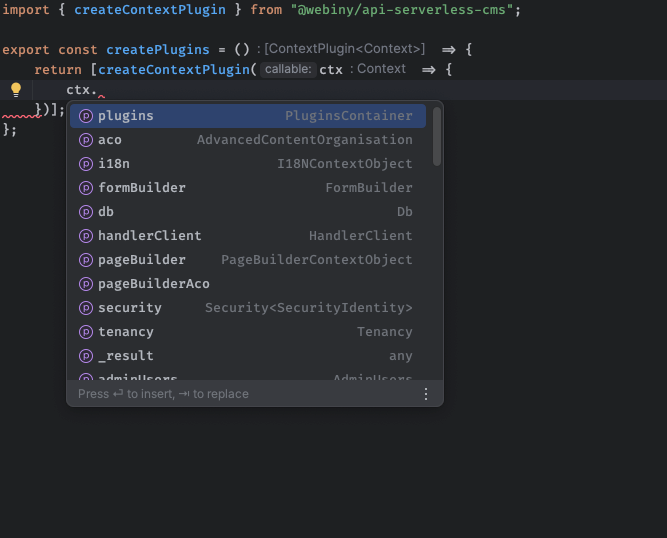
Introducing@webiny/api-serverless-cmsPackage
With this release, we’ve introduced the @webiny/api-serverless-cms package, which contains some of the more frequently used plugin factory functions and utilities. At the moment, the package exports the following two plugin factory functions:
createContextPlugin - used to create a context plugincreateGraphQLSchemaPlugin - used to create a GraphQL schema plugin
And although existing plugin factories will still work, the main advantage of using these new functions is that, when interacting with the context object, users immediately receive full type definitions:
 Context Object - Full Type Definitions
Previously, developers had to type cast the context object to get the correct type definitions (using the Context interface that was included in every Webiny project).
Note that the @webiny/api-serverless-cms package is still in its early stages, and we plan to add more utilities and plugin factories in the future. But we believe that this is a good starting point, and we hope that it will make the development process easier and more enjoyable.
Note on Backward Compatibility
In terms of backward compatibility, note that all of the existing plugins will still work as expected. Optionally, you can replace the existing plugin factories with the new ones to get the full type definitions.
Documentation
In terms of existing documentation, we’ve already updated some of the articles to reflect these changes. But, there are still articles that we will be updating in the upcoming weeks (users will still be able to follow them in the meantime).
Webiny CLI andcreate-webiny-project(#4045)
With this release, we took some time to improve the Webiny CLI and the create-webiny-project CLI, which is used to create new Webiny projects. The focus was on improving the overall user experience and making the CLI tools more user-friendly.
In the following sections, we cover some of the user-facing improvements that were made. For a full list of changes, check out the linked pull request.
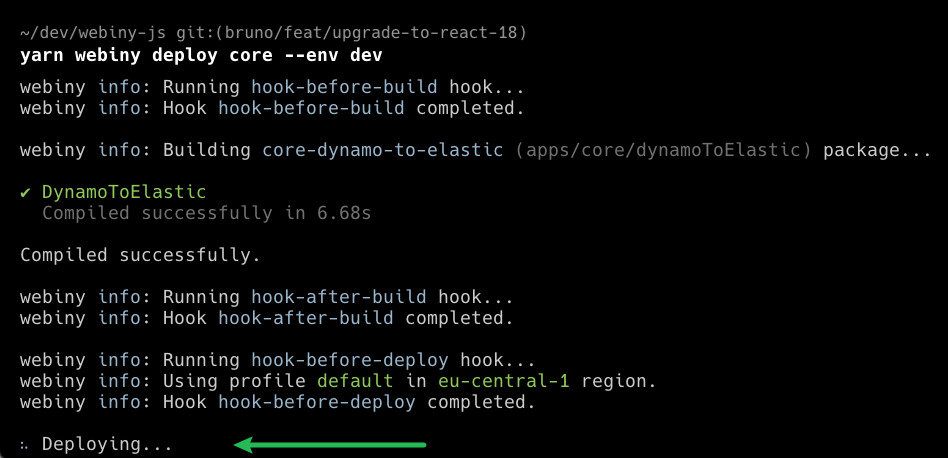
Pulumi Output Hidden by Default
When running the webiny deploy command, the Pulumi output is now hidden by default. This is to reduce the amount of noise in the terminal and to make the output more readable.
 Pulumi Output Hidden By Default
If you still want to see the Pulumi output, you can use the --deployment-logs flag, for example:
Note that, regardless of the --deployment-logs flag, Pulumi output will always be shown in CI environments and in case an error occurs.
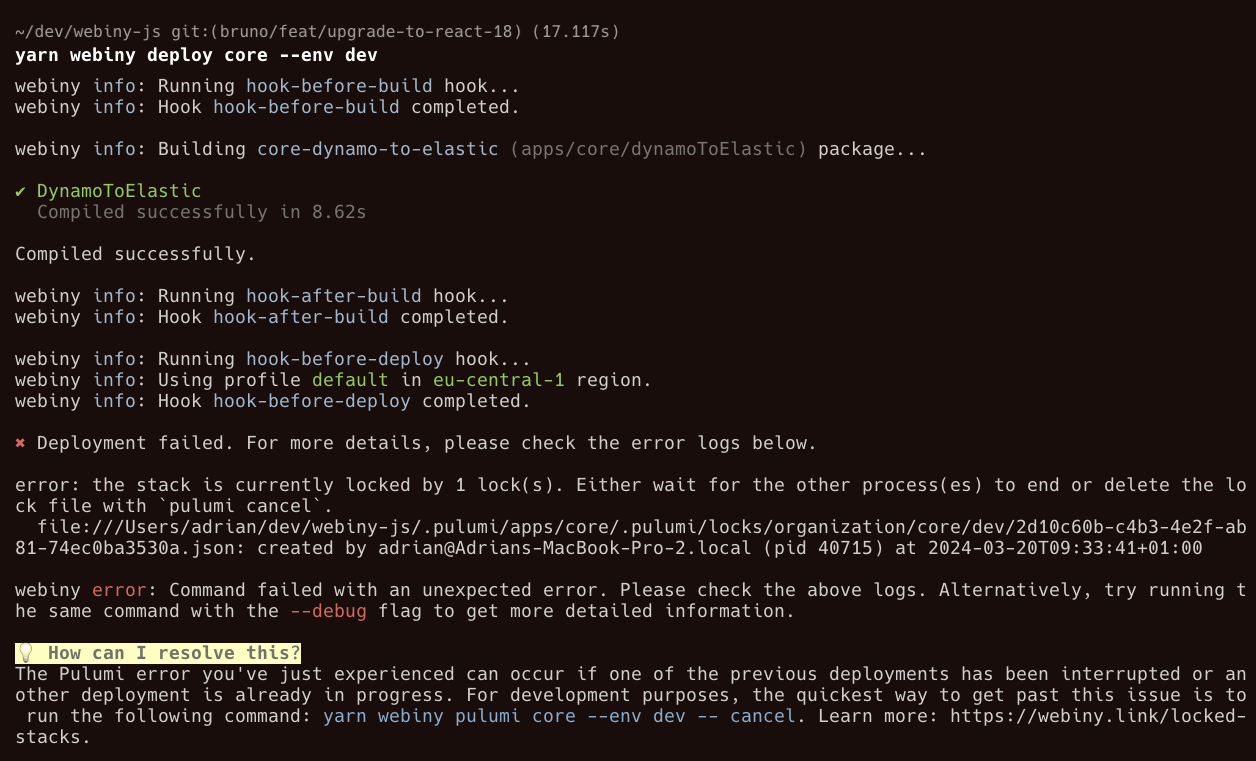
Graceful Error Handling
We’ve improved the error handling in the Webiny CLI. Now, when an error occurs, the CLI will display a more user-friendly error message, along with a suggestion on how to resolve the issue.
 Graceful Error Handling
Note that, at the moment, only a handful of errors are covered by this improvement. We plan to expand this feature in future releases.
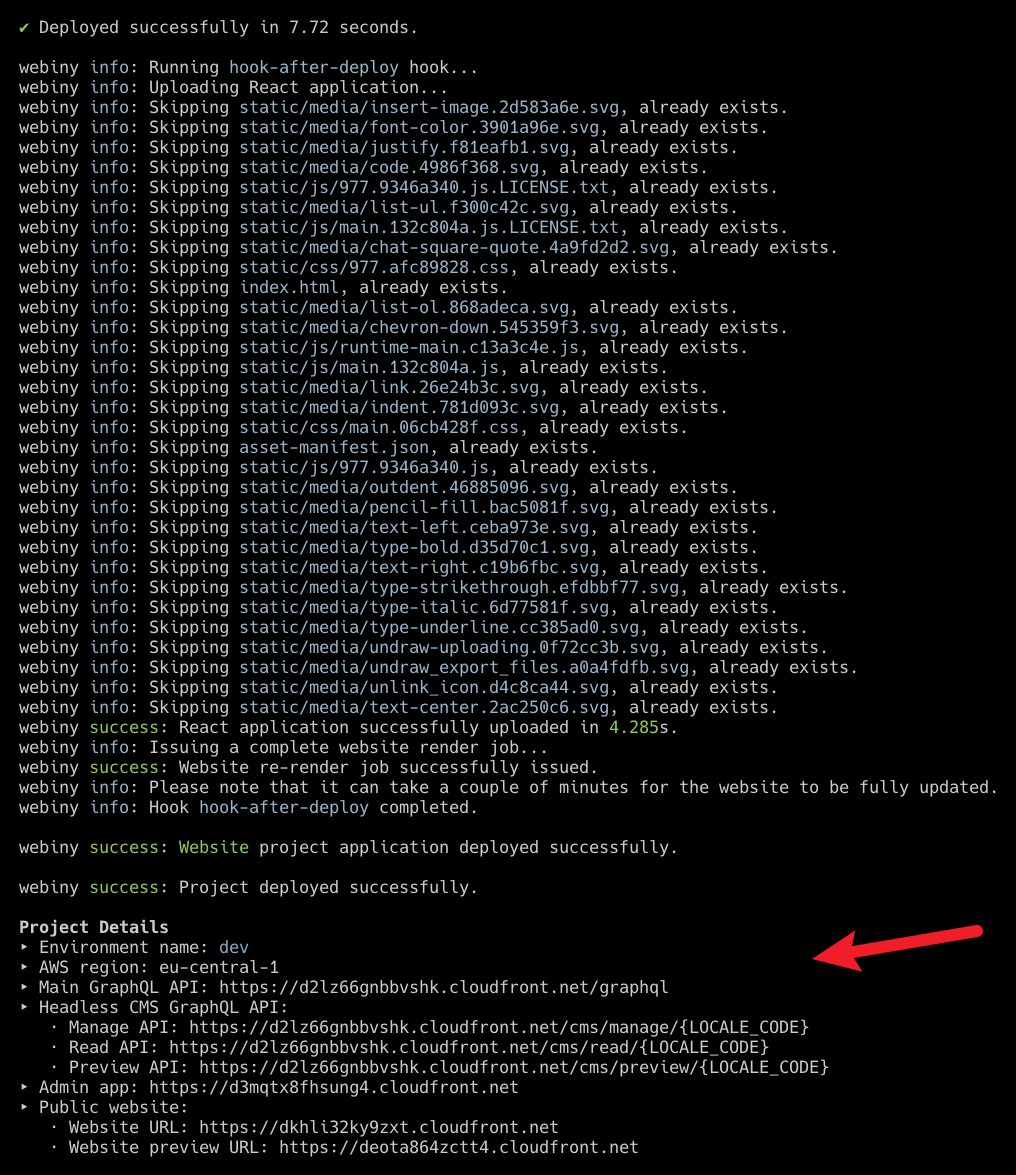
Always Showing Project Details After a Full Deployment
After a successful full project deployment, Webiny CLI will now always show the project details.
 Always Showing Project Details After A Full Deployment
Prior to this release, the project details would need to be fetched manually by running the webiny info command. This way, you can quickly see the project details after a deployment.
Improvedwebiny aboutCommand
The webiny about command has been improved to provide more information about the Webiny project you’re working on. The command now also includes the following information:
- the database setup the project is using
- user’s current version of NPM.
- whether the command was run in a CI/CD environment
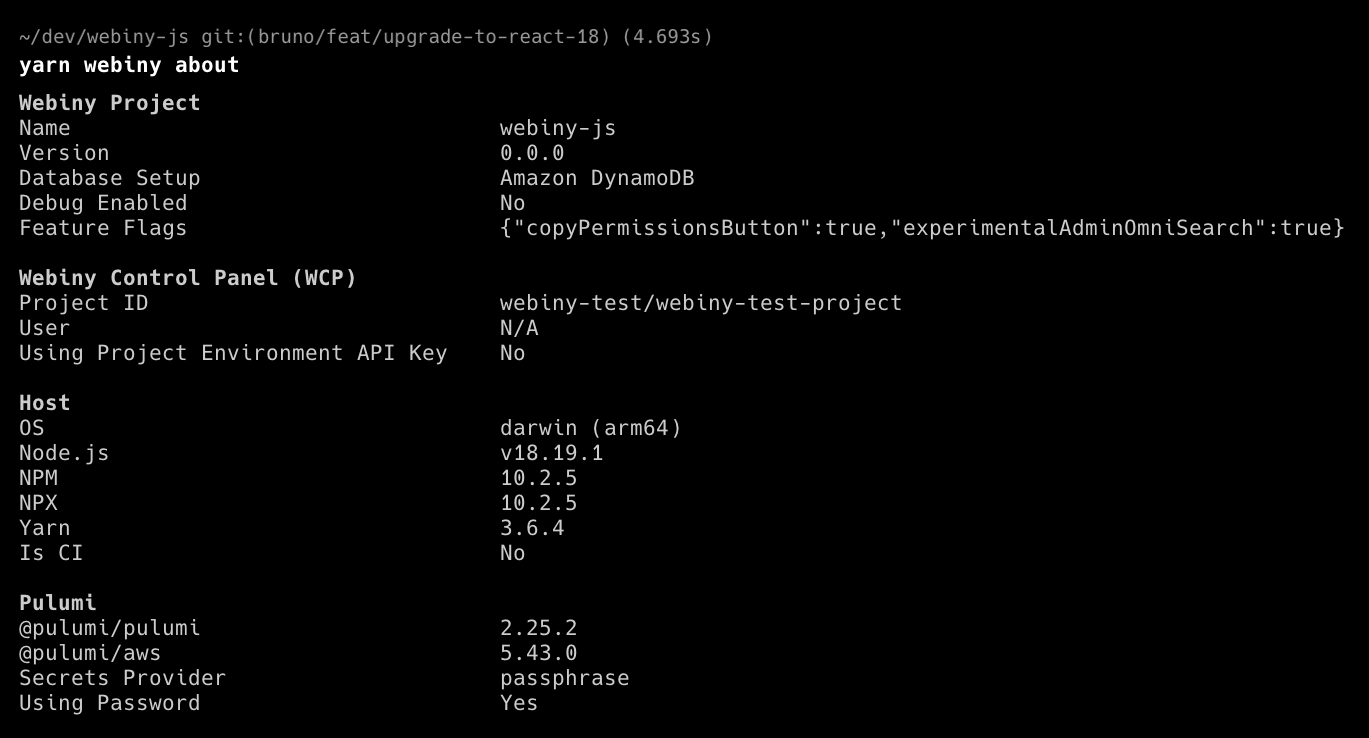 Improved "webiny about" Command
Refreshedwebiny infoCommand
The webiny info command has been visually refreshed a bit.
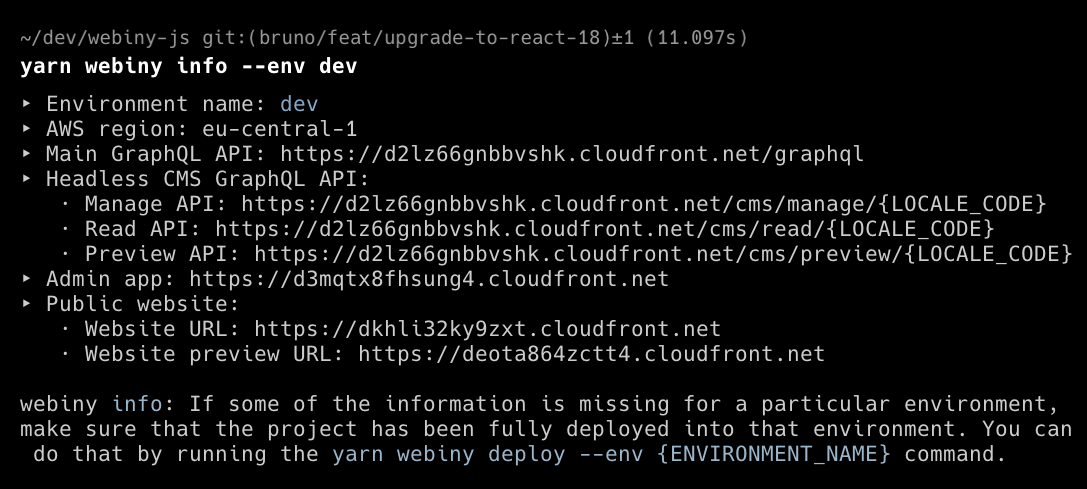 Refreshed "webiny info" Command
Deployments
Introducing Pulumi V6 (#4096)
In order to keep up with the latest features and improvements, we’ve upgraded Pulumi to version 6.
Although no breaking changes are expected, we’ve still compiled a list of all of the things you can expect upon doing your first redeployment after the upgrade here.
Preventing Production Deployments With Locally Stored State Files (#4119)
We’ve seen a couple of cases where uses would still use locally stored Pulumi state files with their production environments. This is not recommended, so we’ve made it a bit harder to do so.
In case a production deployment with locally stored state files is detected, the deployment will fail with an error message. Still, if the user wishes to bypass this check, they can append the new --allow-local-state-files flag to the deployment command.
Other Improvements
Webiny Control Panel (WCP) Badge in Admin App
A small WCP badge was added to the main menu in the Admin application.
The badge is shown when your Webiny project is linked to the Webiny Control Panel (WCP). Also, by hovering over the badge, the project ID will be displayed in a tooltip.
Ability to Hide Menu Items
On the topic of menu items and that Webiny Version widget we mentioned in the previous section, you can now finally decorate every menu item, and decide what you want to do with it: hide, replace, apply conditional logic, etc. So you’ll finally be able to hide Webiny Version widget so many of you wanted to do 😂
The following image shows Webiny Admin navigation without the following menu items: Github, Slack, Documentation, Webiny Version, Tenant Manager.
 Hide Menu Items
To learn more, read the Customize Navigation article.
New Form Package (#4122)
The @webiny/form package powers all Webiny forms across the entire Admin app. The previous version of this package was implemented years ago, and has not received any attention since. With this release, we’ve completely reimplemented the internals of the form, which allowed us to fix many weird glitches, improve data validation, fix default value handling, and more.
For example, the defaultValue prop now finally sets the default value defined on the <Bind> component directly into the form state, as soon as the form is rendered, so your UI will now correctly reflect the default values (this was mostly noticeable on Select and RadioGroup components).
We’ve also covered the vast majority of use cases with Jest tests, which we’re extremely happy about. However, if you do notice some differences comparing to previous versions of Webiny, please report them on our Slack community channel or GitHub repository.
Lexical Editor (#4103,#4098,#4133)
The floating toolbar now hides itself when you click outside the editor container. This was particularly annoying in the Page Editor, when using Lexical in paragraphs or block variables.
Link preview and editing UI was upgraded to improve the UX, and we also added support for alt text on links. The link preview/edit popup now also hides correctly when you click outside of it.
Editor’s toolbar items are now broken into multiple lines when needed (when there’s not enough space for them to be shown in a single line).
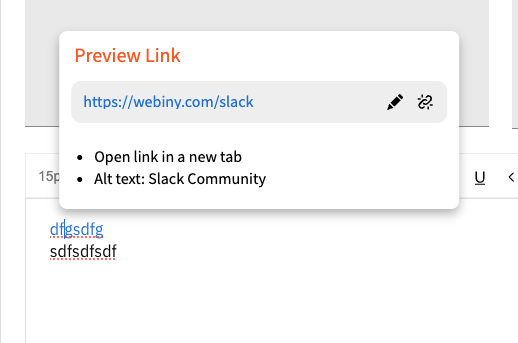 Link Preview
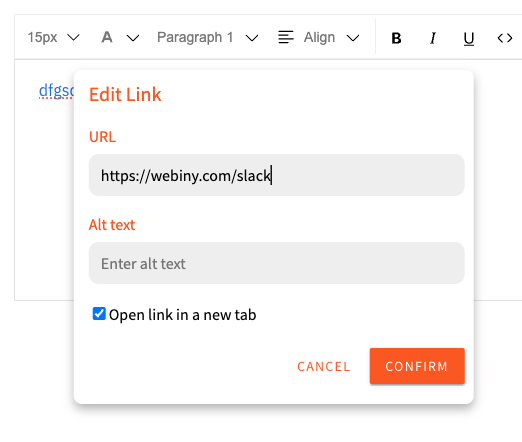 Link Editor
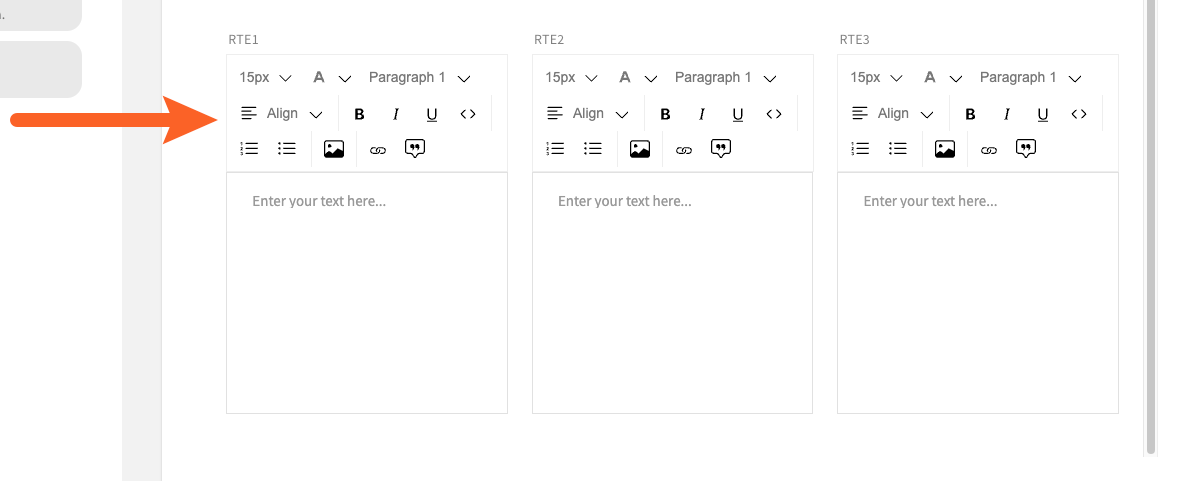 Toolbar Wrapping
Enterprise Features
Cognito Federation With OIDC Providers (#4052)
We now support integration with any OpenID Connect (OIDC) identity provider via Amazon Cognito. This means you can use Webiny, and log into the Admin app, using almost any identity provider on the planet.
For more details, read the Cognito Federation guide.